Do you want to learn how to start a blog in India and make money something like this:
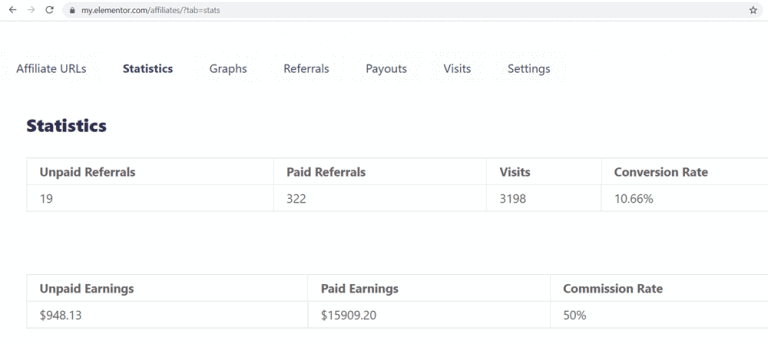
That’s your dream, RIGHT?
Making money from blogging in India.
I am writing this post to show you how to start a blog in India that makes money in 2024.
Here’s a quick summary of this post, what I’ll cover:
- Pick a domain name (URL) and see if it’s available (to cut to the chase, check domain availability here)
- Purchase a hosting package and install WordPress on Hostinger
- Choose the best perfect WordPress theme and plugins
- Writing important blog pages
- New blog promotion and making money hacks
Ready to dig in?
Let’s go…
Want to just get started? Click here to sign up for Hostinger hosting and get your website online as low as ₹79/mo (use coupon code WPBLOGGING101 to get 8% extra discount).
Before I start, let me clear this guide is not for those who are willing to start blogging in India FREE as you must have to invest money first for making passive income.
Yes, that’s true.
Back in 2016, I had created my first blog on WordPress, I had no knowledge about how to blog.
And the bad news was, it was so difficult for me to find answers to basic questions like:
- How to create a blog and earn money in India 2024?
- How to start writing a blog post?
- How to choose the right topic to write a blog?
- How to choose a domain name and web hosting for creating a website?
Like this, so many things came into my mind, and there was no one to teach me.
Ultimately, I had no choice to set up my blog instead of searching on Google for each step. It took me almost 3 to 4 weeks to complete my blog settings.
That’s a considerable time. Right?
And I don’t want it happened to you.
Now it’s almost gone over 5+ years, and here I’m going to show you the basics to advanced steps you need to take when it comes to learning how to start a blog in India and make money in 2024.
Let me remind you again, this guide is only for those who are willing to create a business blog in India, which needs money to invest first.
So, are you ready to start a blogging business?
Let’s do it.
How To Start A Blog in India 2024 and Make Money Free?

Before I move to the leading guide on starting blogging in India, I believe you need to know a few things scale yourself accordingly.
Introduction
Before we are getting started with our main guide, you must have to understand three terms:
- Blog
- Blogging
- And Blogger
Let’s explore…
What Is A Blog?
The word BLOG is shortening of Weblog.
It is like an online journal or an informational website that displays information about a specific topic.
In the beginning, back in 1994, a blog was known as a personal online diary that represents information.
Lately, people found this way to communicate with others by sharing their views on an individual subject.
But now, the time has changed, and everyone is starting a personal blog or website for making money online. In other words, it’s called a blogging business.
The primary purpose of a blog is to connect you with the relevant audience so you can sell your self-made items i.e., eBooks or affiliate products.
In short, a blog works as a bridge between you and your customers.
What is Blogging?
The term blogging is a skill that needs to learn to run and control a blog because just settings up a blog will not bring your dream passive income.
There are hundreds of things involved to get earned a 1st dollar from your blog, such as SEO terms, writing an SEO-friendly blog post, keyword research etc.
Here is an interesting fact is that the blogging field keeps growing every day as it became the prime online source to read and write information on the Internet.
Who is A Blogger?
That’s YOU!
Yes, a blogger is someone who runs and manages a blog with either a boy or girl.
Most people are becoming bloggers nowadays to share their opinions and knowledge on different topics for a target audience.
Most of the people today want to share his/her story online, and the rest of taking blogging to earn a passive income from interest by creating a professional blog.
In recent times, bloggers have become famous for various reasons. And the rest of still struggling for success.
4 Reasons To Start Blogging in India
In this step of learning how to start a blog in India, I will give you some ideas as, why you should start your own blog today.
So, why make a blog in the first place?
Well, it depends!
Here are 4 things that worth your time and money diving into blogging.
You Can Make Money From Blogging Online
You may hear many bloggers earning a lot of money from their blogs. Even some of them made life living like a king with blogging.
Think about it if they can. You can also do it.
Remember, blogging is not a one-night doing money trick or a quick rich scheme.
Sometimes it takes months, even years, to see success doors. As time goes by, your traffic numbers will increase as well as your income.
You Become Your Own Boss
Becoming a professional blogger will turn you into your own boss.
It’s feeling like full-time freedom from orders instead of doing a 9 to 5 job.
Being a full-time blogger since February 2016, I believe starting a blog was the most excellent decision I made in my whole life.
Blogging is An Easy Way To Learn New Things
That’s true!
Blogging is the easiest task if you do it in the right way.
And the hardest part of starting a blog from scratch. But I’ve explained everything in this article.
Once your blog settled up, then you can start writing blog posts to get your site index into Google and other search engines.
Blogging is Like A Helping Hand
Through your blog, you can spread your knowledge and experience to other people online.
Even you can solve different problems with your blog as I help newbies to learn how to start a blog in India and make money online.
This is not the end. Here are some more benefits of having a blog:
- It will turn you into a good writer. Later, you can write your own books and sell them on your blog or Amazon.
- Self-promotion and new opportunities to earn side income.
- It is the easiest way to communicate with other people’s problems and help them to fix them.
- You can create a blog for your local business, and it will help you gain more customers.
Let’s explore the steps how to start a blog in India 2024.
Step 1: Pick A Domain Name
Finding a domain name is required, which is:
- Easy to remember
- Easy to pronounce
- Easy to type
- Including topic keyword
Just keep in mind before registering a domain name for your blog.
Because the name of your blog is the most critical part of success. For example wpblogging101.com.
My suggestion is to find an imaginative domain name. You should follow 5 rules, listed below:
- Always prefer to buy a TLD domain name and choose .COM extension. For example wpblogging101.com
- Don’t use a long name—for example, howtostartabloginindia.com.
- As much as possible, add the topic keyword into the domain.
- Don’t add year (digits).
Note: Adding spaces and punctuations are not allowed in domain names.
Sometimes, it may occur, the domain is already taken by someone you are looking for.
In that case, you can go with .org or .net extension. However, .in is also a useful extension if you are going to target only Indian traffic.
Step 2: Register A Domain Name And Web Hosting
In fact, there are tons of the best web hosting companies in India. For example:
- Bluehost India
- HostGator India
- HostPapa
- Milesweb
- NameCheap
- And the list goes on…
But here, I will suggest you buy a domain name and web hosting from Hostinger.
Why Choose Hostinger Hosting?
I know you may come across dozens of popular web hosting providers, but Hostinger is considered one of the best web hosting providers in India.
The biggest reason to choose this hosting because it is one of the cheapest web hosts comes with excellent features such as:
- Free domain name (worth ₹1100)
- Up to 70% massive discount for WP Blogging 101 readers
- Free SSL certificates
- Fast loading SSD storage
- Managed WordPress hosting
- Unlimited daily backups
- 24/7 live chat support
- Local payment options e.g. Paytm, UPI
- Anytime 30 days refund policy
- And so on – explore all features
Now, it’s time to choose a perfect Hostinger hosting plan.
With each hosting plan, you will get the best and amazing features that make your blog super cool.
Hostinger India has 3 web hosting plans:
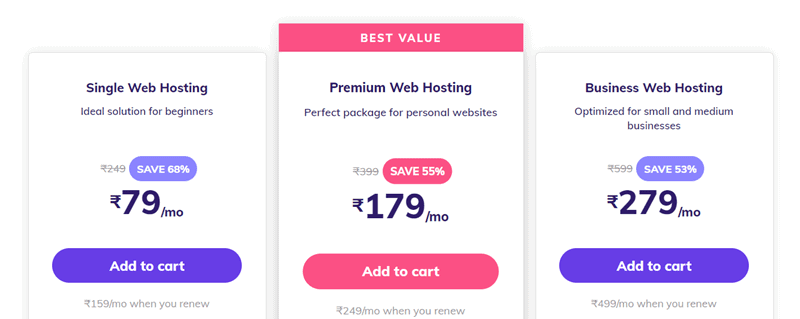
- Single Web Hosting (₹79/mo)
- Premium Web Hosting (₹179/mo)
- Business Web Hosting (₹279/mo)
The basic (single web hosting) plan starts from ₹79/mo, where you can host 1 WordPress blog. This plan can handle up to 10K monthly visits.
To manage a more significant amount of traffic and for starting multiple WordPress blogs, bigger plans are recommended.
Which Hostinger Hosting Plan Should You Buy To Create A Blog in India?
Choosing the best hosting plan for your WordPress blog may be a little confusing the first time.
Let’s make it clear:
Single Web Hosting Plan
In this hosting plan, you will be charged ₹79/mo and get 30 GB SSD storage for up to 10,000 monthly visits.
The only downside is, you need to buy a domain separately from another domain registrar like Godaddy or NameCheap. Then, you can install 1 WordPress blog.
So if you are willing to host 1 WordPress blog, then Hostinger Single Web Hosting Plan is the perfect package for getting started.
Premium Web Hosting Plan (Recommended)
This hosting plan (₹179/mo) is for starting and managing multiple websites (up to 100 sites). It has 30 GB of web space, which can handle 25000 monthly visits.
I highly recommend you buy the Premium even you are just starting. Because later, if you wish to create a separate blog then, no need to invest money in buying another hosting.
Business Web Hosting Plan
The Business Plan also allows hosting for 100 WordPress sites. The best part is that SSD storage goes to 200 GB per account, which can easily handle 100K month users.
This plan costs you ₹279/mo. Under this package, you will get premium features like automatic website backups and a free CDN facility.
Let’s begin buying a domain name and web hosting from Hostinger India (I am choosing Premium Plan for this tutorial).
First of all, click on this special link to activate Hostinger 70% Discount. It will take you to the offer page.

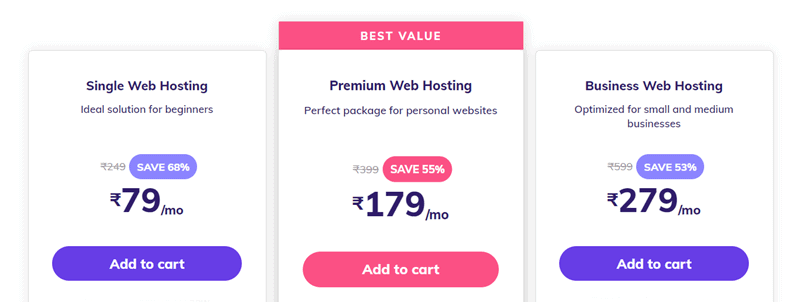
Choose the hosting plan for your website by tapping on the Add To Cart button.
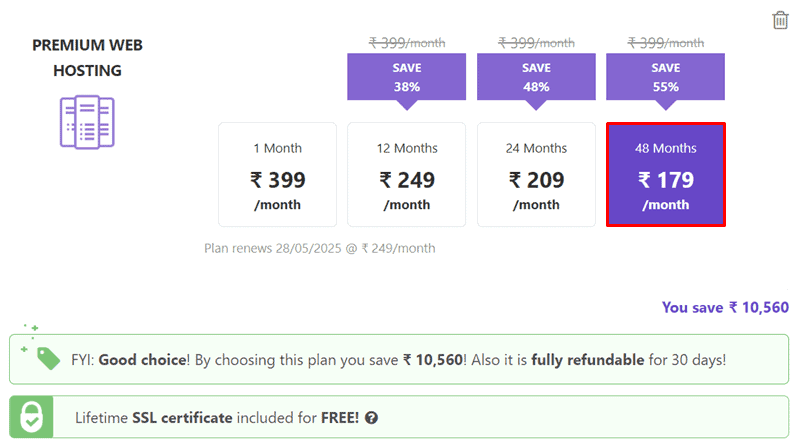
Choose your billing tenure (I strongly recommend you to go with 48 months billing option for maximum savings and a free domain bonus.
Enter the domain you want to register for free.]

Note: If you already have a domain name registered from another domain registrar, then connect it to Hostinger by changing the DNS (Domain name server).
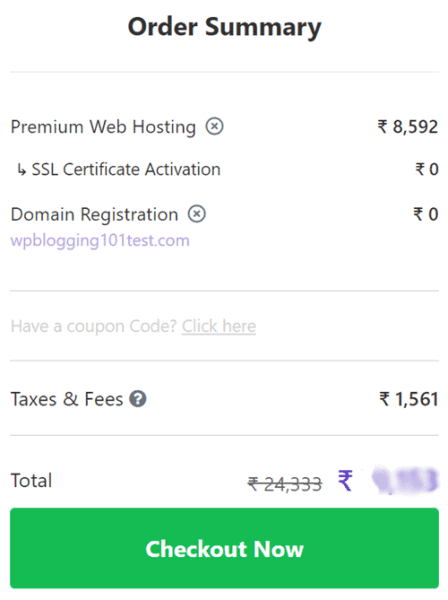
Your domain will be added to the cart automatically. Next, click on the Checkout Now button.
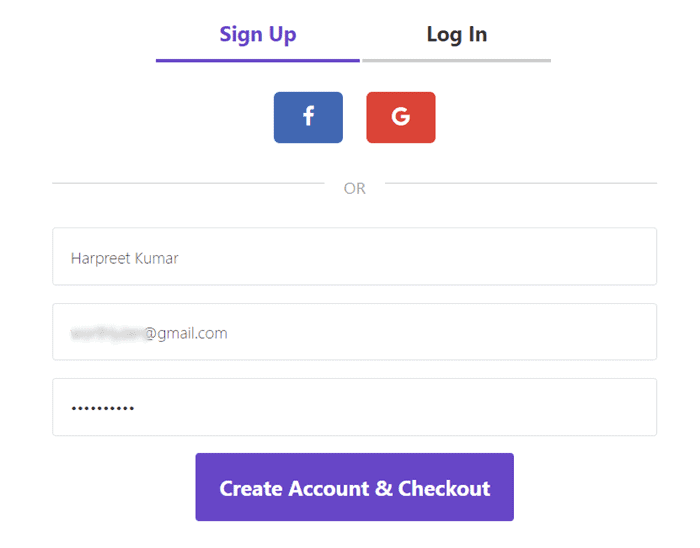
In the next step, create a fresh account by entering your Name, Email, and secure Password (choose a secure password minimum of eight words with the combination of uppercase/lowercase, digits, and symbols).
In the last step, choose the desired payment option and complete the purchase.
Once the payment is sent, your Hostinger India hosting account will be ready in a few moments.
Congratulations, now you have domain and web hosting both in your hands.
Let’s move to the next step.
Step 3: Installing WordPress on Hostinger
I know you were waiting for this moment, right?
So let’s build your first website using WordPress.
Wait wait, before start installing WordPress on Hostinger hosting, let me tell you why WordPress is the best software to create a blog in India.
Why I Love WordPress?
There are dozens of free blogging platforms to create a blog, but choosing WordPress CMS will give you more flexibility to manage your website.
When I say WordPress, Undoubtedly, I am talking about wordpress.org, also known as self-hosted WordPress.
And the other version of this CMS is wordpress.com. Making a blog on wordpress.com is just like starting with blogger.com (Google’s free blogging platform).
To clear your confusion must read the below points to understand the difference between WordPress.org and WordPress.com.
Let’s dive into the comparison, starting with self-hosted WordPress.
Self-hosted WordPress.org
WordPress.org is open-source blogging software, and anyone can download and use it for free.
All you need to purchase hosting and domain to start a blog on it.
Here are the reasons why it is the go-to choice:
- It is super easy to use; even newbies can easily understand it.
- You have full control of your website data.
- Your site will never get down if somebody claims against the content or services you provide.
- WordPress theme library has thousands of free themes to design a blog.
- You can add a free/pad plugin to give more flexibility to your website.
- You can make money from your WordPress blog with different monetization methods.
- Free access to Google Analytics, which keeps an eye on your site rankings.
WordPress.com
WordPress.com is a free hosting service created by the co-founder of WordPress, Matt Mullenweg.
Though it free to use forever but there are so many limitations like you can’t use a custom domain, no option to add plugins etc.
It is so, migrating to WordPress.com premium plan charge you a more significant amount instead of self-hosted WordPress.org.
Here are WordPress.com hosting service has 5 plans:
- Free – Minimal (Lifetime)
- Personal – $36 per year
- Premium – $99 per year
- Business – $299 per year
- VIP – Starting at $5000 per month
Alone Self-hosted WordPress owes 52% space on the web. See the below screenshot:

WordPress holding 72 million actives users, which means the developers are doing something great behind the scene.
Even my all blogs are also running on WordPress.org.
Here is are features that I think you will love to know about WordPress:
- Free to use: As we discussed earlier, WordPress is a free open-source blogging platform and anyone can download, and install WordPress to start a blog. But it would be best if you had web hosting and a domain name to create a website on it.
- Simplicity: You don’t need to have the technical knowledge to make a blog on WordPress.
- Flexibility: With the use of WordPress, you can create any site, whether it is a personal blog or an e-commerce website.
- Free Themes: No need to invest money in buying paid themes.
Let’s install WordPress on your hosting account.
Login to hostinger cPanel.
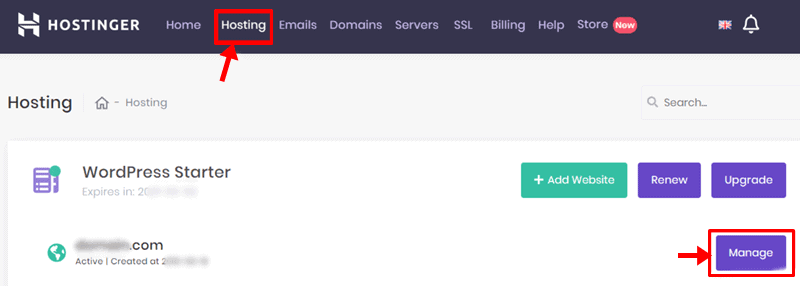
Look for the Auto Installer section.

Under this section, you will find WordPress icon. Click on it.
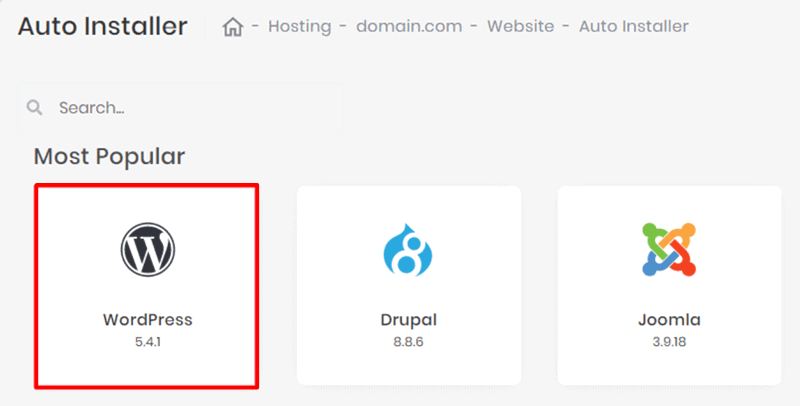
Next, fill up all required details e.g. Website name, domain, email etc.
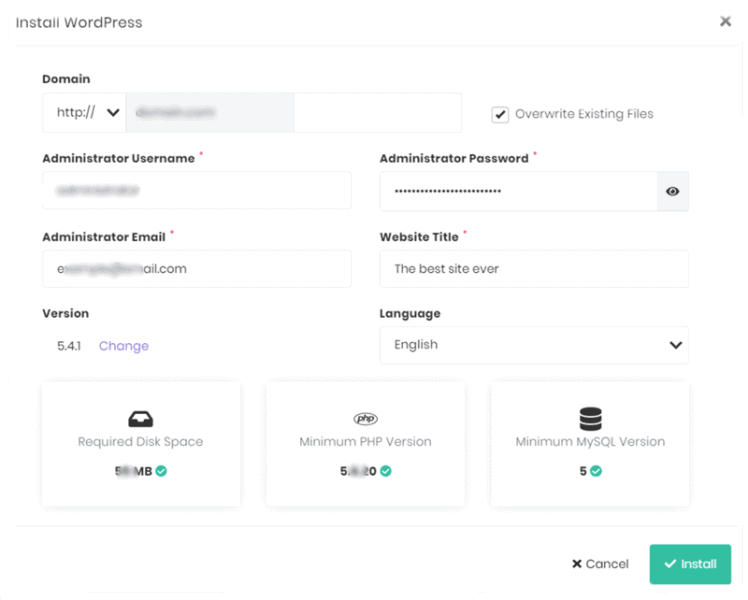
Within a few seconds, WordPress installation will be completed, and your website will appear in the list.
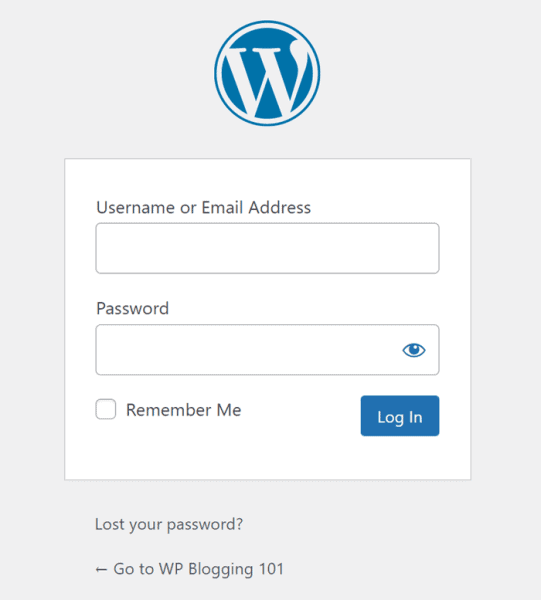
Finally, your blog is ready, and now login to the WordPress dashboard by visiting a link to yourdomain.com/wp-admin. Don’t forget to replace yourdomain with your own domain name.
Enter your Username and Password & click on the Login button. After login, you will be redirected to the WordPress Dashboard.
Step 4: Customize Your WordPress Blog
In this step, we will be learning how to get started with the newly launch WordPress blog.
This customization needs to follow the below steps:
Delete Pre-added Content
WordPress software comes with its pre-added content that we don’t have any benefit from having there.
It’s better to remove it before submitting the site to Google Webmaster Tool.
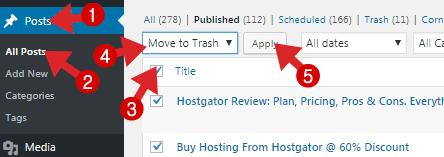
To delete post, click on Posts >> All Posts >> Select Post >> Move To Trash >> Apply.
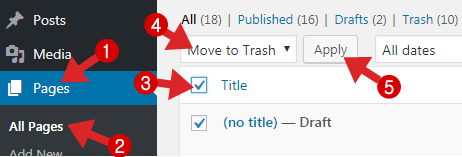
To delete page, click on Pages >> All Pages >> Select Page >> Move To Trash >> Apply.
To delete the plugin first, you have to deactivate them all. To do that, click on Plugins >> Installed Plugins >> Select All Plugins >> Deactivate >> Apply.
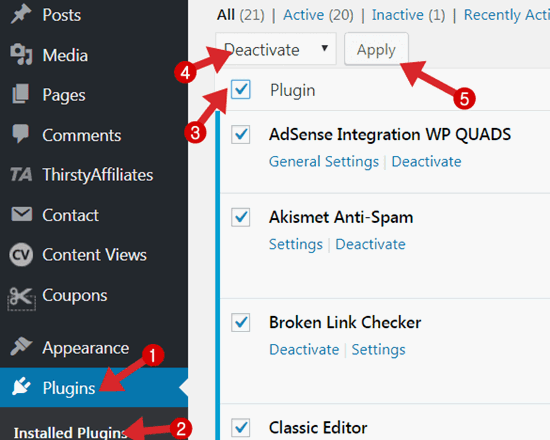
Now repeat the same process by selecting the Delete option.
Choosing An SEO Friendly WordPress Blog Theme
Days are gone when writing a simple post could get the reader’s attention. Now blogging has been changed completely.
Now your blog design and loading speed do matters allow. Being with Hostinger India, you will never face uptime issues.
But if your WordPress theme is not well optimized, then it may take more time to load web pages than expected.
So, choosing a perfect WordPress theme is yet another hard job when you have just created a new blog.
The good news is: There are thousands of FREE & PREMIUM themes available in WordPress theme library, but only a few are well-optimized SEO friendly, and mobile-optimized, such as:
- GeneratePress (my favorite)
- Elegant Themes (super solid library)
- Thrive Themes (a complete business toolbox)
- Astra (highly appreciated by experts)
- Kadence (new foundation growing fast)
- Affiliate Booster (exclusive for affiliate marketing blogs)
In this tutorial on how to start a blog in India, I personally recommend GeneratePress.
You know why?
Because I’m using this on WP Blogging 101 and other affiliate websites. Honestly, I am truly happy with GeneratePress.
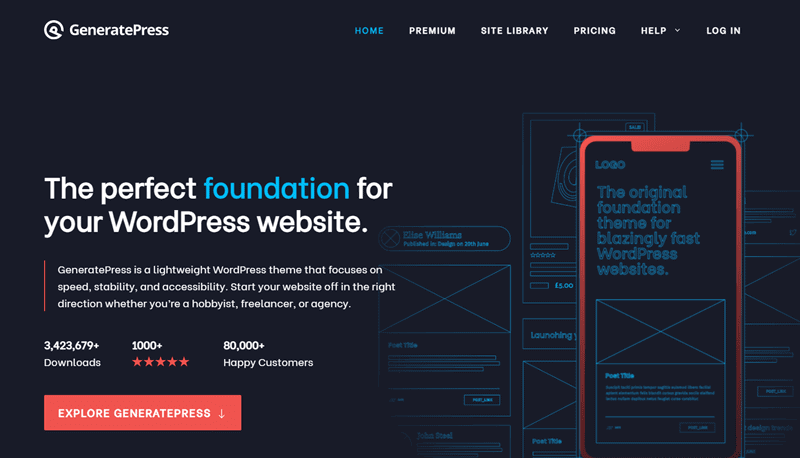
GeneratePress has both a free and premium version.
The core (free) version of GeneratePress allows you to customize various parts of the theme while upgrading to GeneratePress Premium will open all the advanced customizing functions under customizer.
Click here to get GeneratePress (costs $59 for up to 500 WordPress sites).
And enjoy features like:
- Exclusive theme builder
- Extensive site library
- Removable footer content
- Advanced hook system
- WooCommerce supportive
- Ans the features go on…
GeneratePress is one of the best WordPress themes ever found in my blogging career.
Just in case if you are not satisfied with my blog look, then browse the below-listed themes and pick the one you like.
Ok, now you have chosen a theme—the next step to upload and activate that theme in WordPress dashboard.
Start Installing WordPress Theme
The first thing, you need to log in WordPress admin area (dashboard) then tap on the Appearance >> Themes >> Add New.
Search for the theme you want to install on your blog. For example, I searched GeneratePress as shown in the below image.
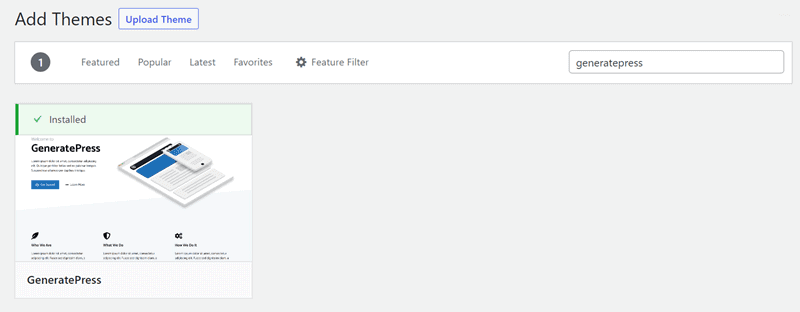
Click on the install theme searched and then activate it.
In this way, you can change or update WordPress theme on your blog.
However, if you have downloaded the theme saved into your computer, then instead of searching, tap to Upload Now and follow the further steps.
Once the theme is activated, delete other pre-added themes from the themes folder because there is no use for them now.
Installing Must-have Plugins
You can control a WordPress site with the help of plugins. These are some tools that add extra features.
Some of them are free, and others are paid for expanding functions.
But the good news is, a beginner can start with free plugins to enjoy premium services SEO Optimization, Blog Security, Site Speed & Performance.
Below, I have listed those plugins, which you must have to use to take your site to the next level.
- Rank Math SEO (review): It will help your site to rank your website into SERPs (search engine page results) the way you want.
- WP Rocket: Automatically deletes caches, revisions posts/pages from WordPress dashboard.
- Akismet Anti Spam: Automatically, put useless comments into the spam folder.
- Wordfence Security: Creates a security layer around your blog to keep it safe from hackers.
- Smush it: Compress media library, which increases page loading speed.
- ThirstyAffiliates: This plugin is for affiliate marketers like me. If you are also going to recommended products on the blog, then you must need this plugin.
- Social Snap: The best WordPress plugin to add beautiful social sharing buttons into posts and pages.
Other Important Settings To Do
There are three prime settings that you shouldn’t miss:
Permalinks: Using an SEO-friendly permalink link structure is not just make your post or page URL attractive but gives a positive point to search engine rankings.
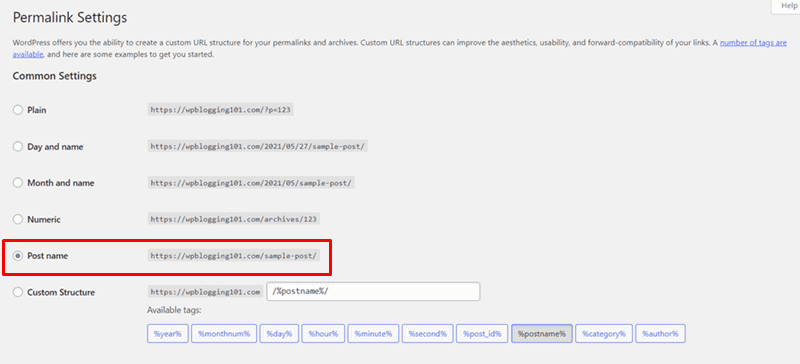
To make your permalinks SEO optimized, tap to Settings >> Permalinks and select the Post Name option.
Timezone: WordPress default timezone belongs to United States, and as a citizen of India, it’s important to choose the Indian timezone.

Go to Settings >> General >> Timezone and Select Kolkata or UTC+5:30.
Pingbacks & Trackbacks: Stop useless comment notifications under Settings >> Pingbacks & Trackbacks.

Pinging Services: Update WordPress ping list to get your articles fast on SERPs.
Start Writing Must Have Pages
Before getting started posts on your blog, there are some pages to be created, listed below:
- About: This will be going to one most visited page of your blog, which gives information about you and your blog mission – see live example
- Contact: In time, if your readers want to connect with you, then they can visit the contact page to send your direct email – see live example
- Privacy Policy: Readers will curious to know how to respect their policy – see live example
- Affiliate Disclosure: When you promote products on your blog as I do, you must have a disclosure policy – see live example
Step 5: Start Writing Blogs Posts
Writing a post on a WordPress blog is simple. Just login WordPress Admin Area.
And tap on Posts >> Add New and a post editor will load on your computer screen like the below image.
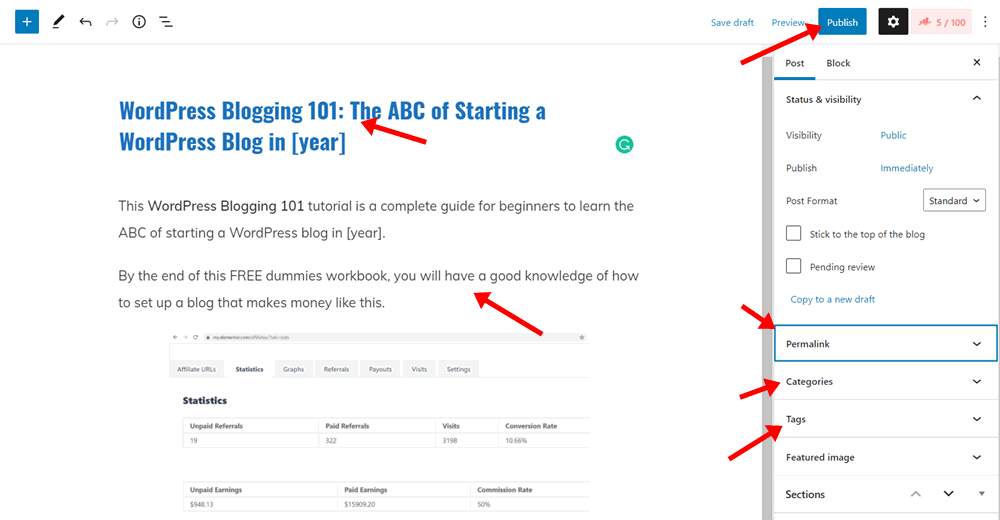
These are central parts of a post editor:
- Title: This is the title of your article, how to start a blog in India and make money is this post title.
- Content: This area is for writing post content. SEO-friendly posts shouldn’t be less than 600 words that must be verified by a free plagiarism checker tool.
- Tags: For adding relevant tags
- Categories: To add relevant post categories.
- Permalink: Use to add focus keyword included permalink (URL).
- Publish: The last click to make your article live on the blog.
Step 6: Promote Your Blog
Once you have a couple of articles on the blog, the next step is to start promoting. Because you just have started, and no one knows about it.
So the best way to get attention to your site is through social networking promotion.
Social sites like Facebook (join our VIP FB group), Twitter, Reddit etc. are the fastest way to get referral traffic to a new website.
Also, don’t forget to submit your website to directory submission sites to get quality backlinks.
Step 7: Start Making Money Blogging
Monetizing a newly launched site is the last part of my guide on how to start a blog in India.
Because today, there is enormous competition and making money from your blog is only more natural if you monetize it in the right way.
There are several ways you can make money blogging, such as:
- Affiliate Marketing
- Google Adsense
- & Sponsored Content
Let’s discuss these tactics one by one:
1. Affiliate Marketing
Every month, I earn a good amount of passive income, around $1000, from affiliate programs I had signed up for.
Here is how this works:
When I signed up for an affiliate program, they provide me with a unique tracking link from the company; I affiliate.
I use to add that affiliate link to my articles, emails and share social media networks.
When someone clicks on that link and ends up buying that product, I earn a commission. In this post, Hostinger India and GeneratePress is a real example of affiliate links.
Affiliate marketing is the fastest way to make money from a new blog only if you do it in the right direction.
Before you get started, I suggested you read this detailed guide on affiliate marketing for beginners.
2. Google Adsense
Google Adsense is the first choice to make money from a blog in India. Even I have one website monetized with Adsense.
Remember, you need to follow their policies before applying for an Adsense account.
Once your application is approved, all you need is to add a script from Google to your site and start displaying ads.
Google will pay you every time anyone clicks on the ads showing on the blog. So, all you have to focus on is generating more traffic to increase Adsense income.
But remember self clicks don’t allow. Otherwise, you will end up with an Adsense account disabled.
3. Sponsored Content
Advertisements lose control over the content displayed on-site, and some bloggers like me don’t want to go with Adsense.
So far, some ads are annoying and distract readers while reading content, and more and many users have an ad blocker activated on their browser, which affects earning potential.
Sponsorship is another way to make money from blogging in India.
In this method, a company will pay you for promoting its products on your blog. But this is possible only if you have a reputation in the blogging field.
Need More Help?
I hope this guide has answered any questions you had on how to start a blog in India to make money in 2024.
But if you get some issues or need any personalized advice, please do not hesitate to contact me at any time. I will be happy to help you.
FTC Disclosure: WP Blogging 101 content is reader-supported. This means if you click on some of our links and make a purchase, we may earn a commission at no extra cost to you – Read Affiliate Disclosure

