So, do you want to learn, “How To Start A WordPress Blog On Bluehost?“.
Congratulations! WordPress is an excellent solution for creating a blog and moreover, you have already chosen one of the best web hosting companies, “Bluehost“.
💡In a hurry? Click right here to jump straight down to step #1 and begin now.
Whether you want to create a blog personal, private, or business today, read this step-by-step guide, with no prior experience and be online in under the next few minutes.
Ready to get in? Let’s get started.
How To Start A WordPress Blog On Bluehost In 2024?

This simple but step-by-step guide will help you: how to setup a blog with WordPress and Bluehost hosting from scratch.
The plus point is, that this guide is 100% free and you need no technical knowledge but only your 100% attention.
First, my story about the blogging field…
Starting a blog was one of the best decisions I ever made in my entire life. All I say, blogging has changed my life entirely, especially after I discovered an affiliate marketing strategy to make money online.
Now it has been more than 6 years gone being a professional blogger in India. And I believe this makes sense; you should follow me while creating your WordPress blog with Bluehost hosting.
Here’s my favourite beginner setup guide on how to start a WordPress blog on Bluehost in 10 steps (based on my 6+ years of experience).
When it comes to the technical side of things, setting up WordPress with Bluehost is actually really straightforward. All you do is:
- Pick a nice blog domain name and register it.
- Sign up for Bluehost hosting – Bluehost is what we recommend as the best place to create a WordPress blog.
- Install WordPress On Bluehost hosting.
- Pick a suitable blogging WordPress theme.
- Install a set of must-have WordPress plugins on your blog.
- Customise your site and make it SEO friendly.
- Write and publish your first blog post.
Doing all these steps – even though they might seem like a lot – but simple, since you’re being taken by the hand along the way; first by your hosting company, and then by the WordPress dashboard itself.
💡 Note: When you’re ready to buy hosting from Bluehost, make sure you use any of my links. It is an affiliate link (meaning that we’ll get a small commission), however, it will also unlock a special discounted price of $2.95/mo for you.
I’ll show you every single step you need to take to start a blog using self-hosted WordPress and Bluehost. And I’ll do it with tons of screenshots and beginner-friendly instructions.
The very first step of learning how to create a website with Bluehost on WordPress is to know the benefits of becoming a blogger in 2024.
Let’s see…
Advantages Of Becoming A Blogger
Anyone can make money with a blog, as I did. I get that invested money back, I had paid for web hosting. And I am 100% sure you’ll do it too if take the right steps.
Blogging is something that everyone should try once in life. Here, I want to talk about why you should build a website/blog nowadays.
Let’s explore its features:
- Blogging is the best way to share your knowledge and opinions online.
- You may hear a saying, “Knowledge is Money“. That’s true. There are millions of bloggers (especially in India & United States) who earn thousands of dollars from their blogs.
- It helps to increase knowledge and turns you into a better writer.
- A simple blog can be utilised as a platform to showcase your knowledge and expertise.
- The wealthiest people in the world build networks because everyone else looks for work and starting a blog is a guaranteed way to expand your network.
Required Things For Starting A WordPress Blog
This is the most common question asked many times on the web, “what are the necessary things should I have to create a website with WordPress and Bluehost?“. And, here are:
- No technical knowledge
- No computer programming
- Not a huge amount of money
- Not a team
Yes, all the above things are not required. Then what do you need actually?
The only three things are required to create a blog on WordPress. Those are YOU, A COMPUTER or LAPTOP, and NORMAL INTERNET CONNECTION.
I know you have already decided to start a WordPress blog on Bluehost hosting. But still, I want to share why Bluehost hosting is the best choice for building a website in 2024.
Why Should You Create A WordPress Blog With Bluehost Hosting?
Bluehost is one of the top WordPress hosting companies in 2024 and WordPress recommended web host on their official hosting page.
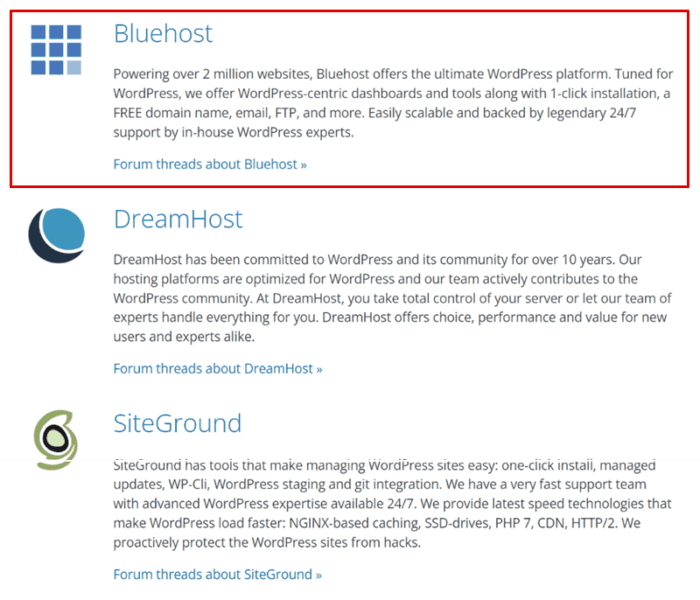
And, I think that is enough reason to start your own blog with Bluehost – costs as low as $2.95 per month only when you end up purchasing a 12-month package.
One more interesting fact is, that when you sign up for Bluehost hosting using my link, you will get a .COM domain name for one year absolutely free of cost.
Generally, Godaddy, Siteground, and A2 Hosting cost $1.17, $15.95, and $14.95 yearly respectively for the same domain registration services.
Additionally, there are many other reasons for choosing Bluehost hosting to start a WordPress blog from scratch. These are:
- It has 1-click WordPress installation software. It means you no need to be technical to create a WordPress blog with Bluehost.
- It has 24/7 days of technical support to serve you the best services whenever you need them.
- Bluehost is a WordPress officially recommended web host that makes it reasonable to build a blog with them.
- Their prices are extremely lower as low as $2.95 than other web hosting providers such as Hostgator or Siteground. You will be getting a free domain (worth $15.95).
- You can cancel your Bluehost account anytime within 30 days of the purchase date. It takes less than 10 minutes to remove your account and get a refund.
- You will be getting a free marketing budget of up to $200 absolutely free of cost.
- Flat 70% discount for WP Blogging 101 readers. It means you can get started at only $2.95/month with the minimum 12-month bill.
There are many web hosts out there, but Bluehost is considered to be in the 1st position in the top web hosting companies such as Siteground and Dreamhost.
And, that is the main reason why most of the top bloggers and webmasters recommend Bluehost for earlier web hosting needs.
See the below Google trends report to this hosting is searched most of the time than other recommended companies.
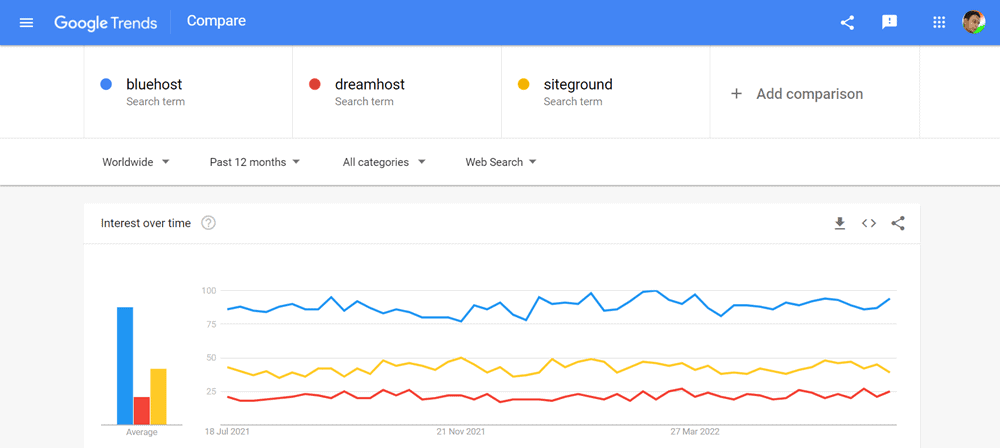
All I want to say, if you are going to start a WordPress blog on Bluehost, then it will be going your first smartest decision to achieve blogging success in the first attempt.
To make this article fully informative, I have covered ten essential steps that you need to follow to start a WordPress blog on Bluehost in 2024.
Don’t worry; there’s very little technical ability needed here, but no coding is required.
So, If you follow these steps, respectively, I bet you’ll have your WordPress blog set up completed within the next few minutes or less.
👉 Step 1: Select A Blogging Niche
The first thing you need to find is a NICHE/TOPIC, that’s about you are going to write content on your blog.
There are over thousands, even 100 thousand topics out there about can start writing. Also, you might have a million ideas bouncing around your head.
But to create a blog around the topic in which you are passionate, will be the smartest decision.
Remember, there are hundreds of NO MONEY topics such as:
- APK Files
- Free SMS
- Free wallpaper
- Hacking tips
- Free movie downloads
- Event blogging script
These niches are less competitive with massive monthly searches. However, even though you will get millions of visits each month, there is not much money you are going to earn from it.
So, if you own skill, then choose that as a tool for your blogging niche. But if you are a beginner and not getting a niche idea for blogging, then I would like to suggest you start with most bloggers.
- Affiliate marketing
- Technology
- How to guides
- Health and fitness
- Movie reviews
Once, you are decided on your blogging niche, the next important step is to get an idea for a domain name.
👉 Step 2: Get A Domain Name Idea
A domain name is the address of a website like wpblogging101.com. As a beginner, getting a kick-ass domain idea in your mind is not an easy job, but remember not hard too.
To get a perfect name, you need to pressure your head to find a crazy name that will be relevant to your blogging niche and express your vision behind the website.
To make your work easier, I am sharing a few tips to help you find a fantastic domain name idea.
- Decide a short name
- Go for a TLD domain extension, such as .COM
- Add at least one keyword
- Make it rememberable
- Choose an easy-to-type name
- Avoid numbers & hyphens
I can understand, that even the above tips are not much beneficial for a beginner, but believe me, finding a niche-based domain name become super easy when we apply some tricks.
Being a blogger since 2016, I have gone through thousands of domain names on the internet. Sometimes I noticed there are extraordinary stunning names. It gives me an idea of how to get a crazy idea to build a perfect domain name.
Here, I am sharing some neat tricks to name your first WordPress blog.
- Use a Fire Word + Niche Keyword: Seotoolsfreetrial.com (Free Trial Start)
- Misspelling your Niche + Fire Word: Wpblogging101.com (WP + Blogging +101)
- Your full name: Harpreetkumar.com (Harpreet + Kumar)
Note: Remember turning your domain name into a valuable brand takes time to be famous as it requires a lot of time, hard work, passion and effort. On the other side, keyword domains like isitdownorjustme.net don’t require too much work (depending on niche competition).
👉 Step 3: Buy Domain + Hosting From Bluehost
One of the best parts of Bluehost hosting is, that you will be getting a free .com domain on any of your hosting plans.
| 👍 Rating | 5 out of 5 ⭐⭐⭐⭐⭐ |
| ✅ Blog Hosting | $2.95 per month (billed for 1 year) |
| ❤️ Free Domain | First-year free (after $17.99 per year) |
| Free Web-Based E-mails/ Forwarding | |
| 🔒 SSL | Free SSL certificates |
| 💽 Storage | 50 GB |
| 📦 Bandwidth | Unlimited |
| 🔗 Website | Bluehost.com |
Follow the guide below step by step to buy hosting from Bluehost at a discounted price.
1) First of all, hit this magic link to visit Bluehost website and click on the green button saying “Get Started Now“. A special discount coupon code will be added automatically.
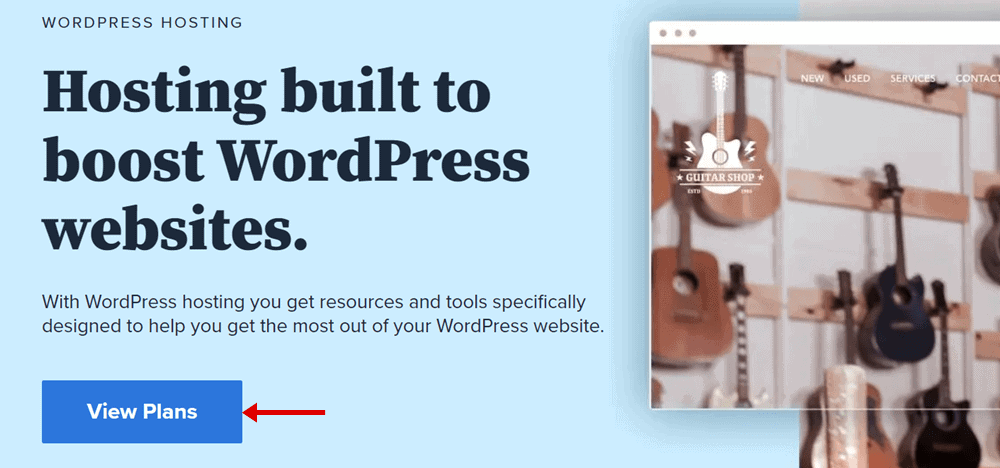
2) Now you will see on the page where Bluehost web hosting packages will be displayed. Here, you have to choose a hosting plan among the “Basic”, “Plus”, “Choice Plus” or “Pro” plans – (see image below).
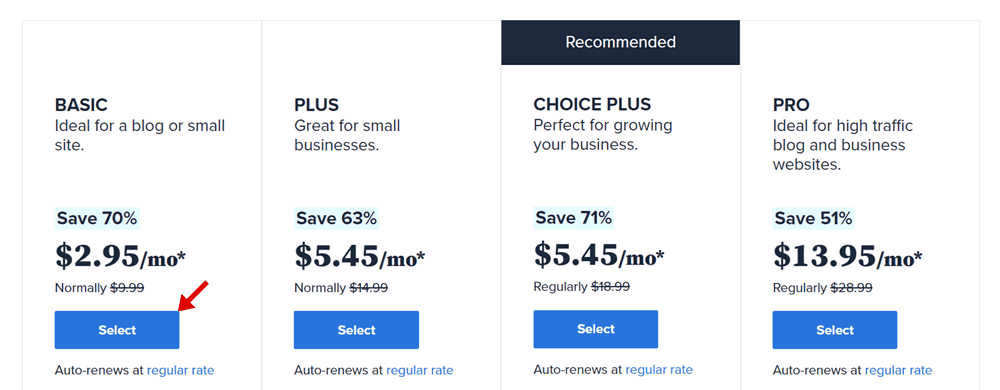
- Basic plan allows you to host a single website on its server, which includes one free .COM domain, 25 subdomains, 50GB storage, 5 email accounts, 100MB email storage, free SSL, Bluehost Starter Plan starting at $2.95/mo, and on renewal time, you’ll have to pay $9.99/mo.
- Plus hosting plan allows you to host unlimited websites. Its pricing starts from $4.95/mo and at renewal time you will be charged $10.99 per month. Plus, the program offers free .COM domain, SSL certificates, unmetered bandwidth, unlimited email accounts, unlimited subdomains, and a $200 marketing offer.
- Choice Plus plan has almost similar features to the Plus plan. All you will get is Access To Website Analytics as an additional feature. It charges the same amount as the Plus plan, but you will be paying approx $4 monthly on renewal time.
- Pro plan has the same features available in the Plus plan + domain privacy, site backup at a price of $5.45/mo, and renewal time you’ll have to pay $14.99/mo.
My Suggestion: I suggest you go with the “Plus” plan as it allows you to create unlimited numbers of websites on it.
3) The next step is to add the domain name you want to register in the left box saying “New Domain“.
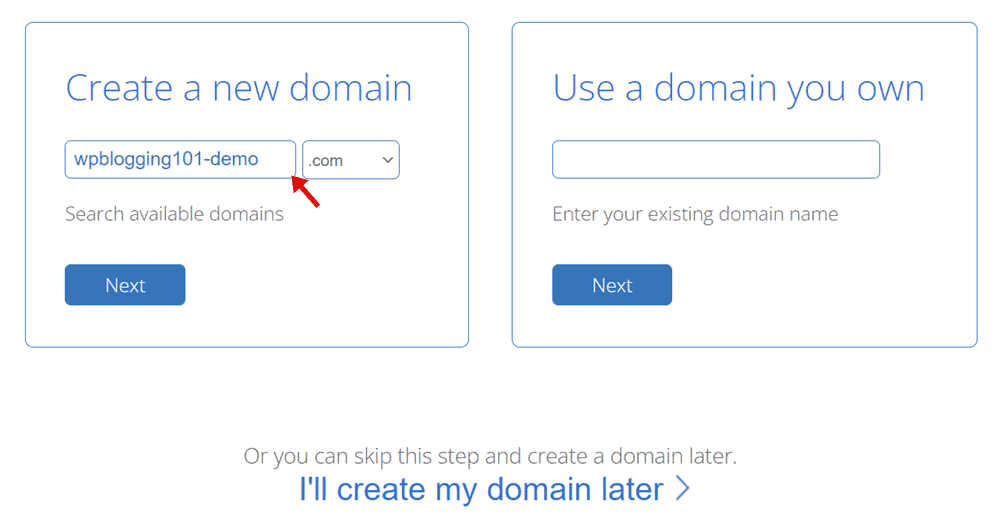
Note: If you have a domain already registered add it, to the right side box that says “I Have A Domain Name“.
4) Here, you have to follow the five steps “Account Information, Package Information, Package Extras, Payment Information & Submit” to finish signing up with Bluehost.
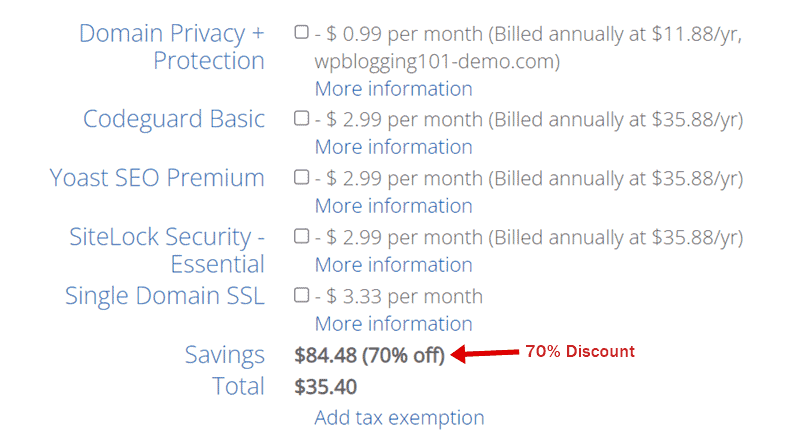
- Account Information: Fill in your basic details like name, address, email, city, street, country, phone number etc.
- Package Information: Select a Bluehost hosting plan tenure (I suggest you buy or 12 or 36 months package to maximize the discount on your hosting bill).
- Package Extras: Bluehost system adds features like “Code Guard“, “Site Lock“, “SEO Tools” and “Office 360 Email Essentials“ automatically. To start a WordPress blog, you don’t really need these add-ons right now. So, untick all. (However, you can keep “Domain Privacy Protection” marked to hide your personal information from WHOIS domain name records).
- Payment Information: Enter your “Credit Card Number“, “Expiry Date” and “CVV Code” to make payment. Either you can click on the “More Payment Option” link to pay your hosting bill via PayPal gateway.
- Submit: Once you are done with the above four steps, accept the “Term & Conditions” and click on the “Submit Button” for “Checkout“.
It will take a few seconds to complete the payment and activate your hosting account (Bluehost system will email you “Account Billing Information” and “cPanel Login Credentials“).
Congratulations, you have successfully purchased web hosting. Now it’s time to start installing WordPress on Bluehost hosting.
I know you were waiting for this step. So, let’s proceed further.
👉 Step 4: Install WordPress On Bluehost Hosting
Now the question comes, “how to install WordPress on hosting?“. Well, Bluehost has wholly revamped its web-hosting and made it WordPress oriented.
These days, there are two different ways to install WordPress on Bluehost hosting. I am mentioning both methods and their choice which one suits you.
Installing WordPress On Bluehost With Marketplace (Legacy)
- Log in to your Bluehost cPanel account.
- Find the website section and then select Install WordPress.
- Click the Install button to start installing the application.
- Choose a domain name to install it to. In the field next to the domain and keep the subfolder empty.
- Set up your username and password for the new WordPress installation by clicking on Advanced Options.
- Accept Terms and Licence Agreements.
- Tap on the Install button.
It will take a few seconds to complete the installation process.
Installing WordPress On Bluehost Hosting With My Sites (Bluerock)
- Log in to your Bluehost hosting account.
- Open the My Sites tab from the left-side menu options.
- Now, click on the Create Site button.
- Enter your Site Name and Site Tagline.
- Click the Next button.
- Select the preferred domain name from the drop-down list.
- Choose the directory this should be installed to, and click Next.
After clicking on the Next button, the application will be installed on Bluehost hosting. For more information, please take a look at my detailed guide on, “how to install WordPress on Bluehost“.
Let’s move to the next step.
👉 Step 5: Delete Dummy Content
After completing WordPress installation with Bluehost, your next step is to remove dummy content from your WordPress site such as posts, pages, plugins, comments, themes etc.
As these are part of the default WordPress installation and we no need such things to keep on a blog.
To delete post, click on Posts >> All Posts >> Select Post >> Move To Bin >> Apply. See example below:

To delete page, click on Pages >> All Pages >> Select Page >> Move To Bin >> Apply. See example below:

To delete a plugin, first, you have to deactivate them all. To do so click on Plugins >> Installed Plugins >> Select All Plugins >> Deactivate >> Apply. See the example below:

Now repeat the same process by selecting the “Delete” option.
👉 Step 6: Install A Professional-Looking Theme
There are thousands of pre-made WordPress themes out there. Some of them are free, while others are paid.
On WP Blogging 101, I use Kadence Theme. It is a FREEMIUM WordPress theme, which means it has free and premium two versions.
If you are setting up a simple WordPress blog with Bluehost then Kadence Theme free version is the perfect choice for you. But if you need a professional-looking website, then Kadence Pro is the best option there. For more details, here’s my honest review of Kadence Theme.
Here are some other most trending SEO-optimized and mobile-friendly WordPress themes in the industry, you can try out:
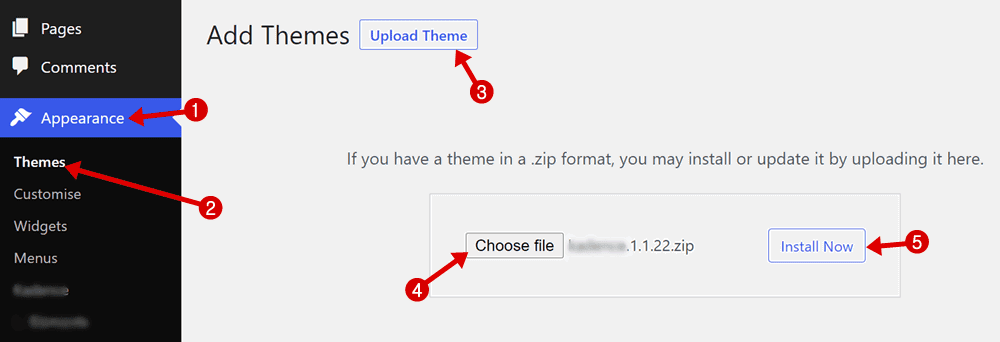
Once you find your ideal WordPress theme, upload it to your site by following WordPress Dashboard >> Appearance >> Themes >> Add New button.
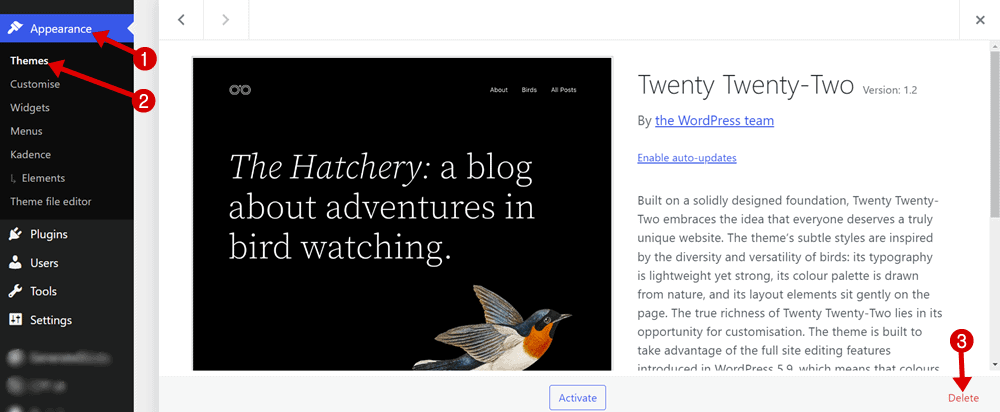
After activating the desired theme delete the other pre-added themes by visiting Appearance >> Themes >> Select Theme and to delete it, hit the Delete button.
In case you have no budget for a premium theme, don’t worry. There are over 6K WordPress themes available in the official wp themes directory, which you can install and use on-site to run a simple blog.
👉 Step 7: Install Essential WordPress Plugins
Plugins are a type of productivity tool that lets you full control of your WordPress blog functions and features.
There are millions of free and paid plugins available on the internet for every task you need to do on the blog.
Thanks to WordPress plugin developers, a beginner can start with free plugins. Later on, we can upgrade to a premium version according to requirements.
Here, I have listed the essential plugins that must be installed, if you really want to get profitable results after setting up a WordPress blog on Bluehost hosting.
- Rank Math (Free + Paid): The only SEO plugin for a WordPress site, I trust most
- WP Rocket (Paid): Exclusive premium WP caches tool
- Wordfence Security (Free + Paid): Website malware removal and security software
- ShortPixel (Free + Paid): Image optimizer plugin
- Thirsty Affiliates (Free + Paid): Best affiliate link cloaking plugin for affiliate marketing blogs
Below are some additional plugins, you may need later as your website grows:
- Kadence Blocks (Free + Paid): Exclusive Gutenberg editor plugin for Kadence Theme users.
- Akismet (Free + Paid): Automatic spam comments detector and removal
- Elementor (Free + Paid): The #1 landing page builder for website template designing
- Social Snap (Free + Paid): Best plugin for adding social sharing buttons
…and still continue.
The list is huge and it totally depends on functions, what you are doing on your website and how you like to manage all things.
👉 Step 8: Important Settings To Do
Before start writing content, there are a few essential settings you need to do before:
- Permalink Setup: Important step for blog SEO. By default, WordPress doesn’t come with SEO friendly permalink structure. So, to make it search engine friendly navigate to Settings >> Permalinks and set the “Post Name”.
- Disable Pingbacks & Trackbacks: To rid of annoying notifications on new articles. Go to WordPress Dashboard >> Settings >> Discussion >> Untick Allow link notifications from other blogs (pingbacks and trackbacks) on new articles option.
- Timezone: Setup your time zone by Navigate to Settings >> General >> Select Timezone according to your country time.
- Pinging Services: Update WordPress ping list by visiting General >> Writing >> Update Services.
- Setup Www/non-www: Www and Non-www are two types of site address. You can set any you like to display to your readers. Navigate to Settings >> General Settings >> WordPress Address & Site Address and set it the way you want.
👉 Step 9: Create Must-Have Pages
When a person visits a website, he/she may want to know more about the behind that particular site.
Besides, to give value to your reader, you must have some essential pages that describe your identity, the motive to blog, privacy policy etc. Here are some pages you must have published after creating a WordPress blog on Bluehost.
- About us
- Contact us
- Privacy policy
- Affiliate Disclosure (for affiliate marketers)
Note: I have linked the above list to my pages. It will help you to understand how to create a professional-looking page and what to write on it.
To add a page on your WordPress site, navigate to Pages >> Add New and start writing.
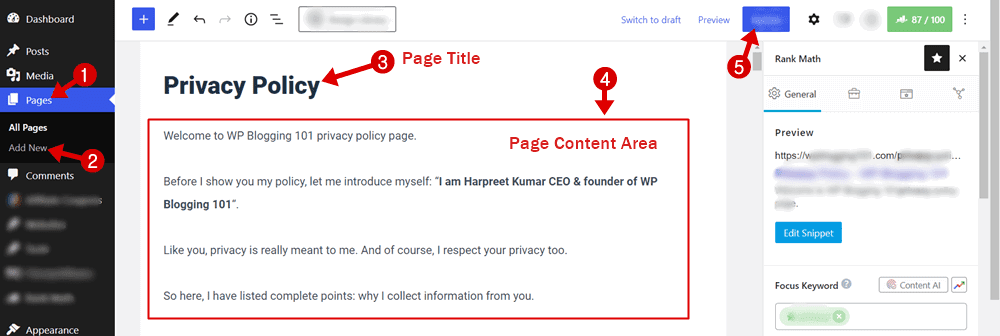
Above are the essential pages to approve a Google Adsense account. However, there is more page like deals, blog, services etc. you may require later depending on what blogging niche you are in.
👉 Step 10: Start Writing Your First Blog Post
Congratulations! You have almost done learning how to start a WordPress blog on Bluehost hosting. Now, it’s time to start writing your first post.
To write your first post go to Posts >> Add New and a WordPress post editor will show on your computer screen like the image below:

In the above image, you can see the box to enter the post title and the rest of the bigger box for writing content.
When you are writing your 1st post, I would like to suggest you write it about yourself. Here, I am sharing some tips to write a meaningful article.
But before we proceed, write your 1st post about yourself like who you are, what’s your aim behind blogging etc.
- Write a catchy post title that attracts users
- Keep URL short including focus keyword
- Add images (with alt tag) and media to your articles
- Write a minimum of 1000 words (Rank Math suggestion) article to get a maximum positive response from search engines
- Add category and tags to your post
- Always use a featured image (you can use Canva to create featured images).
- Once you finish writing your essay, hit the “Publish” button to publicly visible on your WordPress site.
Recommended Blogging Tools (Free & Paid) 2024
After you completed setup your WordPress blog with Bluehost, it’s time to check out essential blogging tools that can make your success easier.
I have shared some of the useful tools that I use to blog on WP Blogging 101. Some tools are free while others are paid. You can grab all the tools to make your blogging journey successful fast in 2024.
Grammarly – Grammar Fixer
While writing lengthy articles in English language, everyone makes silly mistakes. Honestly, without Grammarly tool, I am not able to write even 100 words in the correct format.
Grammarly is my favourite tool to improve my content quality. It finds & highlights errors like wrong verbs, misspellings etc. and gives you correct suggestions to fix them— most all bloggers (even pro bloggers) use this writing tool.
This tool is available free of cost at available as a browser extension. However, a paid version of Grammarly is also available with some extra benefits and remarkable features.
SEMrush – Keyword Research Tool
Semrush (free trial) is one of my most lovable tools to find profitable keywords for my blog posts.
As a newbie, you may be unaware of the importance of keyword research in blogging, but believe me, without the right keyword research planning, there are no chances to rank in SERPs (search engine result pages).
Over the last long years of SEO experience, I found SEMrush has many useful features that make it easy to find what keywords you and your’s competitors’ sites ranking for.
In short, it will show metrics like search volume, keyword difficulty, competitive density, SERP features, and cost-per-click data that help you to analyze your site better to gain maximum traffic from search engines.
Aweber – Email Marketing Software
Do you know emails can skyrocket your conversion rates up to 45%? Then why you shouldn’t try to collect emails from day 1 through your new blog?
This time AWeber, an email marketing tool, comes to play its role that turns your readers into subscribers and then into customers.
It allows 100,000+ small businesses and entrepreneurs to create and send unlimited emails. WP Blogging 101 readers can get claim Aweber free account with lifetime access here (limited time offer).
Final Thoughts On How To Create A WordPress Blog With Bluehost (2024)
I hope by now, you have learned already how to start a WordPress blog on Bluehost hosting.
Even, I think you have built your website already by following the above guide step by step.
Right?
Do you have any problems or questions following this tutorial to create your first blog with WordPress and Bluehost?
Please, don’t hesitate to ask me via the comment box below or message me through the contact page.
FTC Disclosure: WP Blogging 101 content is reader-supported. This means if you click on some of our links and make a purchase, we may earn a commission at no extra cost to you – Read Affiliate Disclosure

